

Restoring Victorian Floors: Guide to Period Woodwork
Stripping back a century-old carpet to reveal original timber isn't just a home improvement task; it's a significant act of architectural conservation. Whilst the initial sight of heavy black bitumen and decades of accumulated grime can be daunting, learning how to restore Victorian floors is the essential first step to unlocking the authentic soul of your period home. You likely worry about the potential for a house-wide dust mess or the persistent drafts whistling through wide gaps, yet these historic features are far more resilient and rewarding than they first appear.
We recognise that you want to preserve the unique character of your property whilst achieving a finish that meets modern standards of comfort and durability. This guide will help you master the art of sympathetic restoration, ensuring you bring your floorboards back to their former glory without compromising their historical integrity. We shall preview the technical precision of professional dust-free sanding, the importance of sourcing reclaimed timber for invisible repairs, and how to select the latest low-VOC finishes that highlight natural grain whilst meeting 2026 sustainability standards.
Table of Contents
Assessing Your Victorian Floorboards: Is Restoration Possible?
A successful project begins with a clinical evaluation of what lies beneath the dust. Victorian floorboards are a finite resource; once they're gone, they're gone. Restoring these original features can significantly bolster a UK property's market value, often providing a more authentic aesthetic than modern engineered alternatives. However, before researching how to restore Victorian floors, you must determine if the timber possesses enough structural substance to survive the sanding process.
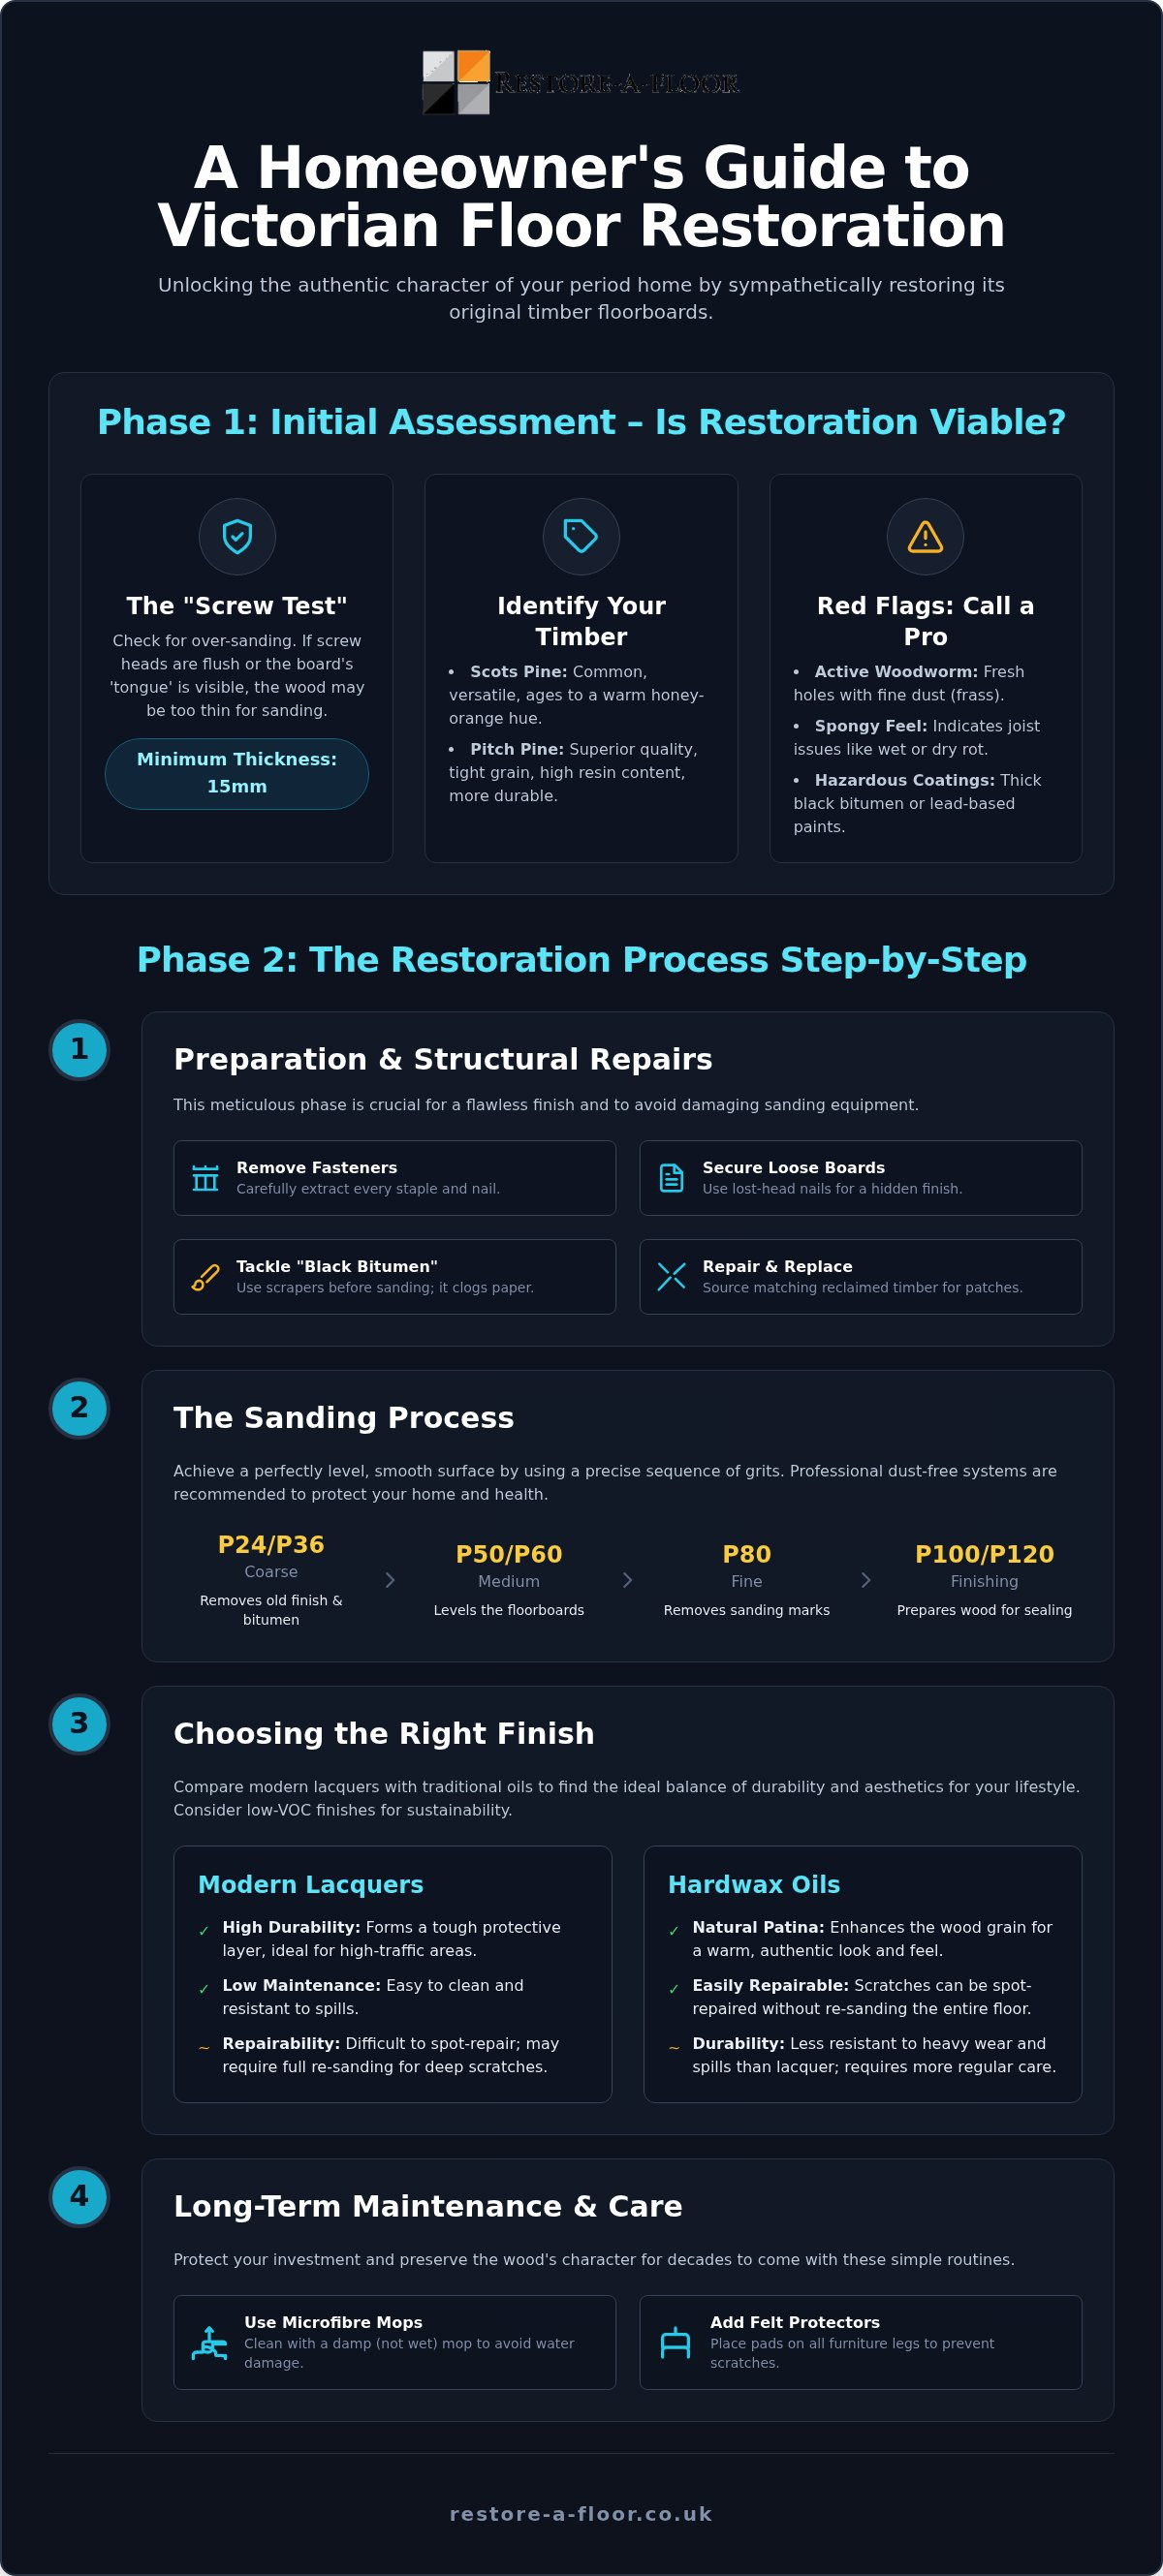
Perform a "Screw Test" to check for previous over-sanding. Locate a board near a radiator or doorway where wear is typically highest. If the screw heads are flush with the surface or the "tongue" of the board is visible, the wood may be too thin. A board thinner than 15mm might lack the stability required for a heavy drum sander. It's better to discover this now than halfway through a destructive sanding pass.
Identifying Common Victorian Wood Types
Most 19th-century homes utilise Scots Pine, a versatile softwood that ages to a warm, honey-orange hue. In higher-status rooms or grander residences, you might find old-growth Pitch Pine. This is a superior material, recognisable by its incredibly tight grain and high resin content, which makes it denser and more durable than modern timber. The colour varies amongst different regions; northern industrial towns often favoured darker stains, whilst coastal properties might reveal lighter, salt-bleached tones. Recognising your species helps in sourcing the correct reclaimed timber for any necessary repairs.
Signs Your Floor Needs Professional Intervention
Whilst minor dents add character, certain conditions require specialist equipment or timber replacement. Understanding these limitations is the first step in learning how to restore Victorian floors without causing irreversible damage to your home's historical fabric.
Active Woodworm: Look for tiny, "fresh" holes with fine dust (frass) around them. This suggests an active infestation that needs chemical treatment before any sanding begins.
The "Spongy" Feel: If boards dip or bounce underfoot, the issue usually lies with the joists. Wet or dry rot in the subfloor is a structural failure that cosmetic sanding cannot fix.
Hazardous Coatings: Thick black bitumen or old lead-based paints are notoriously difficult to remove. These materials clog standard sandpaper instantly and can pose health risks if not managed with professional-grade, HEPA-filtered extraction systems.
If your floor shows widespread structural damage or is coated in heavy Victorian bitumen, the project moves from a simple DIY task to a conservation-grade restoration. Taking the time to assess these factors ensures your floor remains a durable feature for another century.
Preparation and Structural Repairs: Beyond the Surface
Uncovering your floor is often a messy revelation of rusted staples, splintered grippers, and decades of dust. Before you can even consider the aesthetic finish, you must meticulously prepare the canvas. This involves removing every single metal fastener with pincers and a pry bar to prevent damaging your sanding equipment later. If you are committed to learning how to restore Victorian floors correctly, patience during this phase is your greatest asset. Securing loose or "springy" boards is equally vital; always use lost-head nails driven below the surface with a nail punch to maintain a traditional, fastener-free appearance once the wood is sealed.
The notorious "Black Perimeter" is a common obstacle in Welsh and West Country terraces. This thick coating of Victorian bitumen was originally applied to the edges of rooms where carpets didn't reach. It is incredibly stubborn and will instantly clog standard sandpaper. Rather than forcing a sander through it, professionals often use a heavy-duty scraper or specialist chemical strippers to remove the bulk before the first sanding pass. For any boards beyond repair, sourcing reclaimed timber is essential. You must match the specific width and grain pattern of your original Scots or Pitch Pine to ensure the patch is invisible once finished.
Repairing Joists and Sub-floor Issues
A joist is a horizontal timber beam that provides the primary structural support for your floorboards. If your floor feels uneven or bouncy, the issue likely resides here. You can level the floor by "sistering" new timber alongside weakened joists or by using hardwood shims to fill small gaps. Whilst the boards are up, check that your air bricks are clear. Adequate sub-floor ventilation is the only way to prevent the damp conditions that lead to rot and woodworm. If the structural integrity of your sub-floor seems compromised, seeking professional wood floor restoration can prevent long-term damage to your property's fabric.
The Art of Gap Filling
Filling the voids between boards is critical for both thermal efficiency and aesthetics. For narrow gaps under 2mm, a paste made from fine sanding dust mixed with a specialist resin provides an excellent colour match. However, Victorian boards are prone to significant seasonal movement. For wider, drafty gaps, we recommend using reclaimed pine "slivers" or fillets. These are wedge-shaped strips of wood glued into the gaps and then sanded flush. This method provides a durable, all-wood finish that eliminates the whistling drafts common in period properties whilst allowing the floor to breathe naturally.
The Sanding Process: Achieving a Dust-Free Finish
Once the structural repairs are complete, the transformation truly begins. Understanding how to restore Victorian floors requires a disciplined approach to the sanding sequence; skipping steps here will inevitably result in a sub-par finish. We always begin with a coarse 24 or 40 grit abrasive. This initial pass is not merely for cleaning; it is designed to level the undulating boards and strip away the remaining stubborn residues of Victorian life. From there, we progress methodically through 60 and 80 grit, concluding with a 120-grit pass to achieve a smooth, furniture-grade surface ready for sealing.
Edge sanding is a delicate operation that requires specialised equipment to reach the very perimeter of the room. Whilst the large drum sander handles the main body of the floor, a dedicated edger is used to sand right up to the skirting boards. Precision is paramount here. A steady hand ensures that you don't scuff the original woodwork or leave unsightly "swirl marks" where the two sanding patterns meet. This meticulous attention to detail distinguishes a professional restoration from a rushed DIY attempt.
Why Dust-Free Sanding is Non-Negotiable
The traditional image of floor sanding involves clouds of choking dust and weeks of cleaning. This is no longer the standard. Modern industrial dust-extraction systems capture 99% of airborne debris at the source, creating a "clean-room" environment that is safe for families. This technology is particularly vital when dealing with Victorian timber, as old floorboards often harbour lead-paint particles or allergens that pose significant health risks if inhaled. By utilising HEPA-filtered vacuums, we protect your soft furnishings and freshly painted walls from the invasive fine dust typical of hire-shop machinery.
Mastering the Drum Sander
Operating a drum sander is an exercise in controlled movement. You must maintain a consistent walking pace; pausing for even a second will create deep "chatter marks" or gouges in the soft pine that are incredibly difficult to remove. Always follow the natural grain of the wood to prevent cross-grain scratches that would be magnified once a finish is applied. Managing the transition between the main floor and the edges is the final technical hurdle. By blending these areas with a fine-grit orbital sander, we ensure a seamless, uniform texture across the entire room, providing the perfect foundation for your chosen lacquer or oil. This level of precision is a core component of how to restore Victorian floors to a professional standard.
Choosing the Right Finish: Colour, Protection, and Patina
The final stage of your project is where the character of the property is truly defined. Selecting a finish is not merely an aesthetic choice; it's a strategic decision based on footfall and environmental conditions. In high-traffic Swansea hallways or busy Cardiff reception rooms, maximum durability is often the priority. Modern water-based lacquers provide a commercial-grade shield that resists scuffs and spillages whilst allowing the timber's natural beauty to show through. Conversely, hardwax oils offer a more traditional, matte patina that penetrates deep into the grain. Whilst oils require more frequent maintenance, they're exceptionally easy to spot-repair over time, making them a favourite for homeowners who value a natural, tactile feel.
Understanding how to restore Victorian floors involves managing the inherent warm tones of the timber. Original Scots pine naturally deepens into a rich orange-red over time. If this feels too traditional, the "white wash" or lime-wash trend is an excellent way to modernise the space without obscuring the historic grain. This technique lightens the wood, creating a Scandinavian-inspired aesthetic that feels airy and contemporary whilst respecting the floor's 19th-century origins.
Staining Techniques for Period Homes
Achieving a uniform colour on century-old wood requires precision. Always test samples in inconspicuous corners, as the porosity of the wood varies significantly between the centre of the room and the edges. Water-based stains offer a wider colour palette and faster drying times, whilst oil-based alternatives provide a longer "open time" to blend out lap marks. Victorian pine reacts to dark oak stains by absorbing pigment unevenly across its dense grain and resinous knots, often resulting in a high-contrast, rustic appearance. To ensure a flawless result, we recommend a professional wood floor refinishing service to manage these complex timber behaviours.
Sealing for Longevity
For a truly durable result, the application process is as important as the product itself. We apply multiple coats of your chosen finish, ensuring each layer is meticulously buffed once dry. This "denibbing" process removes tiny raised wood fibres, resulting in a glass-smooth surface that feels luxurious underfoot. In line with 2026 environmental standards, we prioritise low-VOC, water-based coatings that meet the E1 emissions standard. These modern formulations provide a commercial-grade residential finish that's safe for families and pets, ensuring your restored floor remains a healthy and beautiful centrepiece of your home for decades. Learning how to restore Victorian floors effectively means balancing these modern technological advantages with traditional craftsmanship.
Maintenance and Professional Restoration Services
Once you've mastered how to restore Victorian floors, the focus shifts to preservation. Daily maintenance is the key to ensuring your investment lasts for another century. You should avoid traditional wet mopping at all costs; excessive water can penetrate the grain, causing the soft pine boards to cup or warp. Instead, utilise a dry or slightly damp microfibre mop. This effectively captures grit and dust without introducing moisture that could compromise the bond of your lacquer or oil. For heavy Victorian furniture, always apply high-quality felt pads to the feet. This simple step prevents the deep, abrasive scratches that occur when heavy mahogany or oak pieces are moved across the floor.
Whilst routine care is manageable, certain scenarios require a specialist's eye. If you discover deep scratches that have breached the protective seal or notice signs of water ingress near bay windows, professional intervention is necessary to prevent the timber from greying or rotting. Our team brings over 20 years of industry experience to every project, providing a bespoke service that respects the historical fabric of your home whilst delivering a durable, modern finish.
Long-term Care for Restored Floors
Use PH-neutral cleaning products specifically formulated for wood. You must avoid supermarket "all-purpose" cleaners that can strip the finish and leave the timber vulnerable. Every 5 to 7 years, we recommend a "Screen and Re-coat". This process involves a light abrasive pass to key the surface followed by a fresh layer of finish, effectively refreshing the floor without the need for a full sand-back. In coastal regions like Swansea and Cardiff, managing indoor humidity is essential. Aim for a consistent level between 40% and 60% to minimise the natural expansion and contraction of the pine boards, which helps to keep your gap-filling intact.
Professional Restoration in South Wales & West England
South Wales and the West of England possess a unique architectural heritage, from the grand villas of Bristol to the dense terraces of the Rhondda. Local expertise is invaluable because timber behaviour varies depending on the property's proximity to the coast and its exposure to damp. We understand the nuances of period-correct repairs and the importance of using reclaimed timber for a seamless result. Whether you're dealing with extensive structural damage or simply want a bespoke finish that highlights the wood's natural patina, we act as a knowledgeable guide through the technical journey of conservation. We invite you to reach out for a consultation to discuss the specific requirements of your period woodwork.
Revitalising Your Period Property's Legacy
Restoring a Victorian floor is a significant undertaking that yields remarkable rewards for the diligent homeowner. By prioritising a thorough structural assessment and utilising reclaimed timber for seamless repairs, you preserve the architectural integrity of your residence whilst creating a durable foundation for modern living. We've explored the technical sequence of how to restore Victorian floors, from the precision of the initial sanding pass to the selection of high-performance, low-VOC finishes that protect the wood's natural patina without compromising indoor air quality.
With over 20 years of specialist experience across Swansea, Cardiff, and Bristol, our team provides the expert guidance and technical proficiency required to manage complex period woodwork. We utilise advanced dust-free sanding technology to ensure your home remains a clean, healthy environment throughout the transformative process. Whether you seek the maximum durability of a commercial-grade lacquer or the tactile warmth of a hardwax oil, we're committed to delivering a finish that reflects your specific requirements and the unique character of your property.
Take the first step towards bringing your original floorboards back to their former glory. Book your free dust-free floor restoration survey today and let our master craftsmen guide you through the journey of conservation. Your historic floor is a finite treasure; it's time to let its true beauty shine once more.
Frequently Asked Questions
Is it better to restore original Victorian floorboards or replace them?
Restoration is generally the superior choice as it preserves the original character and increases the property's market value significantly. Whilst modern alternatives exist, they lack the dense grain and historical patina of authentic 19th-century timber. Unless the boards are structurally compromised beyond repair, choosing how to restore Victorian floors is a more sustainable and authentic investment than replacement, ensuring your home retains its unique period charm.
How much dust does Victorian floor restoration actually create?
Professional restoration creates negligible dust when performed with industrial-grade extraction systems. Unlike DIY hire machines that disperse fine particles throughout the home, our specialist equipment captures 99% of debris at the source. This protects your furniture and freshly decorated walls, making the process far cleaner than most homeowners anticipate. It's a clean-room approach that ensures minimal disruption to your daily life whilst protecting your family's health.
Can you remove the black bitumen paint from the edges of the room?
Yes, Victorian bitumen can be removed through a combination of heavy-duty scraping and coarse-grit sanding. This stubborn tar-like substance was traditionally used as a border for rugs, but it can be stripped back to reveal the natural wood beneath. Professionals use specialist abrasives and techniques to prevent the bitumen from melting and clogging the sandpaper, ensuring a clean and uniform finish across the entire room perimeter.
How long does it take to restore a Victorian floor in a standard-sized room?
A standard-sized room usually takes between two to three days to complete, depending on the required repairs and the chosen finish. The first day is dedicated to preparation and coarse sanding, whilst the subsequent days involve fine sanding and the application of multiple coats of lacquer or oil. You must also account for drying times, which vary depending on local humidity and the specific chemical formulation used.
Will restoring my floorboards make my house colder or more drafty?
Restoring your floors actually improves thermal efficiency when combined with professional gap-filling techniques. By using reclaimed pine slivers or resin-based fillers, we seal the voids between boards that cause whistling drafts. This process eliminates the uncontrolled airflow from the subfloor, resulting in a warmer, more energy-efficient room that retains the beauty of the original woodwork without the discomfort of cold air leaking through the boards.
Can I change the colour of my Victorian pine floors with a stain?
You can certainly alter the colour of your pine floors using specialist stains to match your interior design. Whether you desire a deep walnut tone or a contemporary white-wash, pine is highly receptive to pigment. However, because it's a porous softwood, the stain must be applied evenly to avoid blotchiness. Testing samples on your specific boards is essential to ensure the final shade meets your expectations.
Is floor sanding a DIY job or should I hire a professional?
Whilst DIY hire is possible, professional restoration offers a level of precision and cleanliness that is difficult to achieve alone. Industrial machines are more powerful and produce far less dust than hire-shop equivalents. Specialists also possess the expertise to handle lead-paint risks and structural repairs, ensuring you don't accidentally ruin your historic floorboards with deep gouges or uneven sanding marks that are difficult to correct.
How do I fix gaps between my Victorian floorboards?
Fixing gaps depends on their width and the desired aesthetic outcome for the room. For narrow gaps, a mixture of fine sanding dust and resin creates a seamless match. For wider gaps, we glue and hammer in wedge-shaped strips of reclaimed pine, known as slivers, before sanding them flush. This traditional method provides a durable, all-wood solution that accommodates the natural movement of the timber over time.


Comments